You can perform a lot of tasks within your WordPress dashboard – but you can’t do everything. Sometimes, you may need to make a change directly to one of your site’s files. This might be to tighten security or add some custom code. A little research will tell you that File Transfer Protocol (FTP) is the way to go, but what is FTP?
In short, FTP enables you to connect directly to the files that make up your WordPress site. You can then edit, add, and delete information and code directly, without having to visit your dashboard. The applications of FTP are numerous, and it even simplifies some of your most common tasks.
This guide will answer the question: What is FTP? Then, we’ll teach you how to access your WordPress files using the FTP tool FileZilla. Let’s get started!
What is FTP?
So, what is FTP? File Transfer Protocol (FTP) is a way of transmitting information between a server and client. Your website’s files are stored on your web host’s servers, and you can use FTP to access those files from your computer. Any changes you make will be automatically implemented on the server itself.
There are many reasons you may need to access your site this way. For example, you can use FTP to:
- Install plugins and themes directly, should you need it.
- Manually deactivate plugins and themes if you ever get locked out of your WordPress dashboard.
- Upload media files in bulk, rather than one at a time.
- Make changes to core WordPress files such as .htaccess, to implement customizations and extra security measures.
- Diagnose and fix common errors on your site, such as compatibility issues, internal server errors, and so on.
Often, when you look for a tutorial on how to do something within WordPress or search for advice on fixing a specific problem, you’ll be directed to use FTP. So even if you don’t have a specific use in mind, learning this now means you’ll be prepared when you do find yourself facing an FTP-related task.
Introducing FileZilla
To actually use FTP, you’ll need what’s known as an ‘FTP client’. This is a program that enables you to make a direct connection to the server where your website’s files are stored.
If you’re just getting started, we suggest checking out FileZilla. This is a free, easy-to-use tool that’s great for beginners. It’s also recommended by WordPress itself, particularly because it’s open-source. The developers even offer lots of useful documentation to help you get started.
How to use FTP to access your WordPress site
You now know the answer to the question: What is FTP? Now it’s time to learn how to access your website. We’ll be using FileZilla for this tutorial, but the steps will be similar no matter what tool you select.
Step 1: Back up your site
Before you get started, it’s important to understand the risks inherent in using FTP. You’ll be making permanent changes directly to your site’s files, which means that if you aren’t careful you can make irreversible mistakes. Therefore, it’s crucial to make sure you have a recent backup in place, so you can restore your website if anything goes wrong.
Step 2: Install FileZilla
Once you have a backup of your site, install FileZilla by visiting the website and clicking on the button to download the client:

Find and download the correct version for your computer, then run the .exe file to install it. After that, you can simply start up the client – no special configuration is required.
Step 3: Connect to your host using FTP
When you open up FileZilla, you should see a screen similar to this:
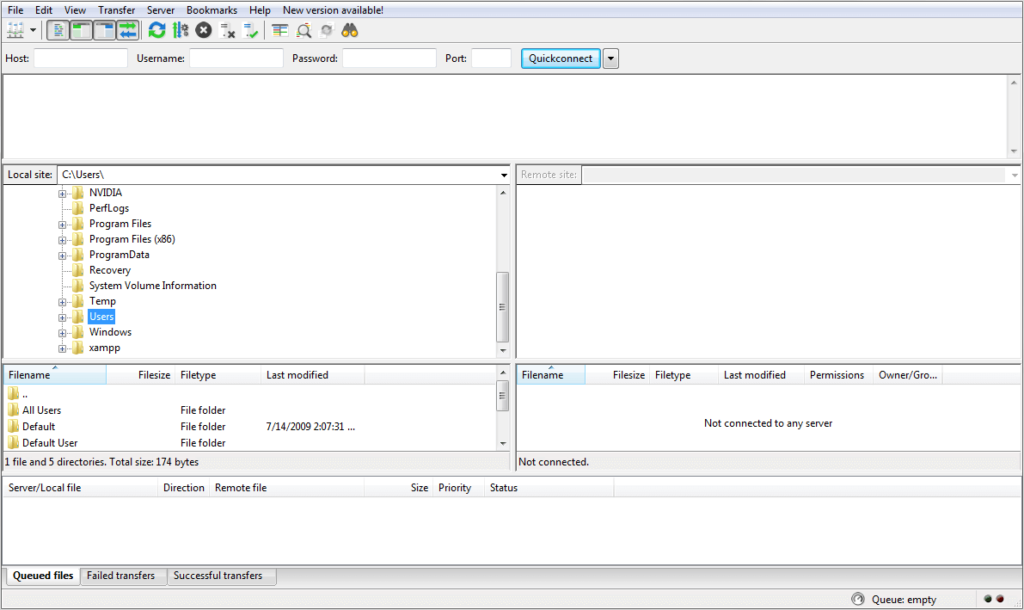
There should be four empty fields near the top: Host, Username, Password, and Port. The last field will fill itself in automatically. The first three, however, represent your unique FTP credentials:

In order to access your site using FTP, you’ll need your web host’s FTP address, as well as your personal FTP username and password.
All this information is available through your hosting provider. How you find it will vary depending on the company. In general, you’ll need to log into your hosting control panel and find your credentials in your personal account information. Most hosts offer documentation that tells you exactly where to look. If not, your best bet is to contact them directly.
Once you have your credentials, simply enter them into FileZilla and click on the Quickconnect button. Give it a few moments to work. Soon, you should see a message letting you know the connection has been established:

It’s worth knowing that you don’t have to re-enter your credentials every time you want to access your site. Instead, simply navigate to Server > Reconnect, and FileZilla will log back into your host. Alternatively, click the drop-down arrow next to the Quickconnect button and select your server from there.
Step 4: Manage Your WordPress Files
Now that FileZilla is connected to your web server, you should see files and folders in each of its four main quadrants:

The two quadrants on the left display the files on your local computer, while the quadrants on the right show your website’s files. To move files between the two locations, all you need to do is drag and drop them.
On the right, you should see a folder named after your website’s domain (although it could also be called public_html or www) – this is where all your site’s data is stored. Opening it will reveal a few more folders:
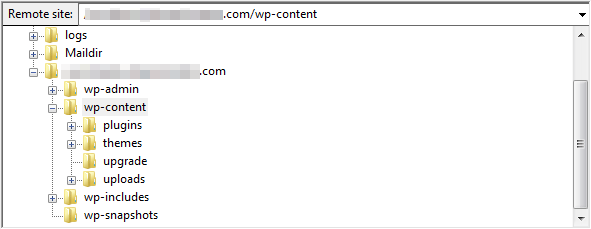
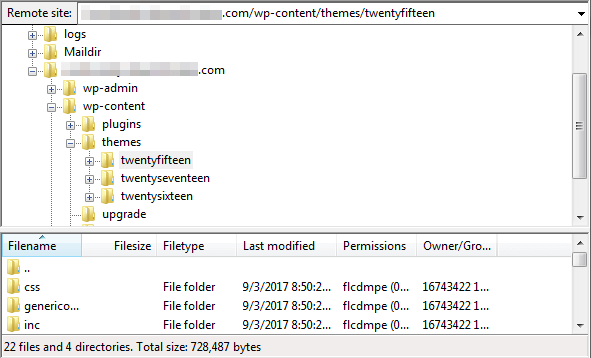
Most of the time, what you’re looking for will be in the wp-content folder. For example, this folder contains sub-folders for your themes and plugins. This means you can open up your current theme to make changes, delete a theme, or install a new theme by copying and pasting it into your themes folder (or dragging it over from your computer’s files):
You now know how to connect to your site using FTP and locate your website’s files. If you spend some time exploring those files now, you’ll be well prepared whenever you’re required to use FTP in the future!
In Conclusion
We hope that this article will be useful for you! FTP enables you to work directly with the files that make up your site. Knowing how to access your site using FTP is a crucial skill for any WordPress site owner to have.


