You can accomplish a lot in WordPress without ever leaving your dashboard. If you want to get the most out of your website, however, you should to know more about things that happens behind the scenes. A vital first step in that process is understanding how to use the .htaccess file in WordPress.
Your WordPress site relies on several important ‘core files’ to do its job, and the .htaccess file is one of them. While by default it only performs a few tasks related to your site’s permalinks, it can be added to and customized to carry out all sorts of useful functions like redirecting visitors to your site or beefing up your site’s security.
In this article, we’re going to introduce you to the .htaccess file and explain what it’s all about. Then, you’ll learn how to find the .htaccess file in WordPress, as well as some of the helpful things you can do with it.
What the .htaccess file in WordPress is (and how it works)

The .htaccess file is a configuration file for the Apache web server (which is what most WordPress hosts use). In other words, it contains rules that give your website’s server various instructions. Just about every WordPress site has an .htaccess file, located in the ‘root’ or central directory. It’s a hidden file (which is why the filename begins with a period), and has no extension.
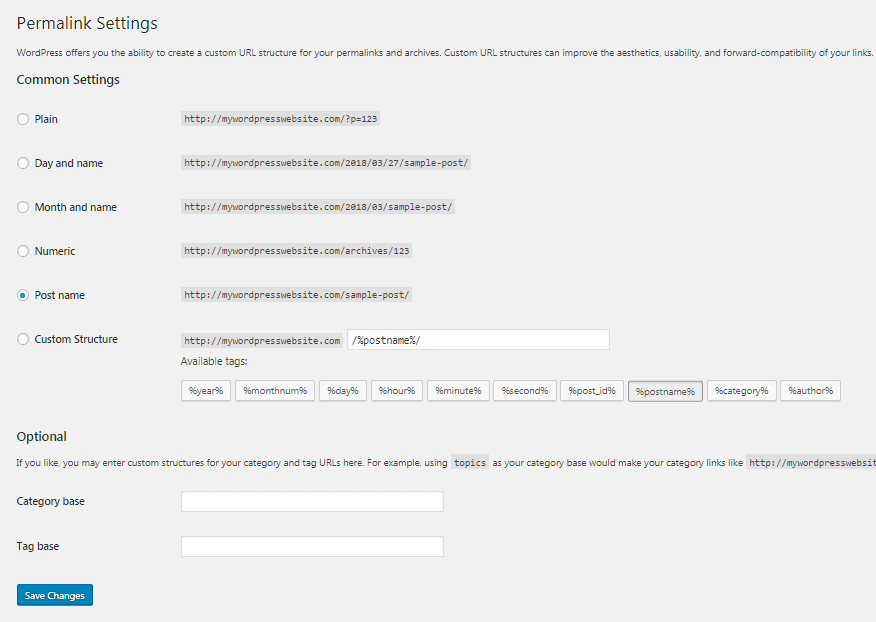
By default, the .htaccess file in WordPress handles one major task: It controls how your site’s permalinks are displayed.
If you make a change to your permalink structure, therefore, the .htaccess file updates with new instructions for the server. In fact, sometimes the .htaccess file isn’t actually created on your site until the first time you customize your permalinks.
On many sites, this is all the .htaccess file ever does. However, you can also use it to make various tweaks to your site’s functionality. For example, you can set up 301 redirects in the .htaccess file. You can also use it to tighten security, such as by restricting access to your site and other core files.
Additionally, some plugins will add their own rules to your .htaccess file to help the plugin function. This is especially common with caching or security plugins.
If this seems a little abstract, don’t worry. You won’t need to understand all the technical details in order to find and make changes to the .htaccess file in WordPress.
How to locate and edit the .htaccess file in WordPress
Before we go any further, we need to discuss a few safety measures. It’s important to understand that making changes to your site’s files directly can be risky. If you aren’t careful, you can end up breaking factors that control your site’s key functionality, or even bring down your site altogether.
There are a few ways to mitigate these risks:
- Back up your site before editing any of its files. This way, you can quickly reverse unintentional changes and mistakes.
- Use a staging site to test your edits before performing them on your live site. On a staging site, you’re free to experiment without any worries.
- Download the .htaccess file to your local computer before making any edits. That way, if you specifically break something in your .htaccess file, you just need to upload the original copy to fix the issue.
To access the .htaccess file in WordPress, you’ll need to make a direct connection to your website through File Transfer Protocol (FTP). You’ll need an FTP client, such as FileZilla, and some FTP credentials from your web host.
Once FileZilla is connected to your site, you’ll see a window that looks like this:

Check out the top-right quadrant. You should see a folder named after your site’s domain – this is the root directory. Select this folder, and check out the list of folders and files located immediately below it:

The .htaccess file should be listed here, usually as one of the first entries.
To open it:
- Right-click on it
- Select View/Edit to open the file in your computer’s default text editor
You can now make whatever changes you like to the file using your text editor.
Once you’re done:
- Save the file
- Close the file
A window will pop up asking if you want to upload the new, edited version of your .htaccess file to the server. Select Yes, and your changes will take effect immediately.
If you can’t find the .htaccess file in your root folder, it may not exist yet. You can prompt WordPress to generate one by visiting Settings > Permalinks in your dashboard, and clicking on the Save Changes button (you don’t actually have to pick a different structure):

When you re-open FileZilla and navigate to your website’s root folder, the .htaccess file should now be there.
What you can do with the .htaccess file in WordPress
Now that you know where to find the .htaccess file in WordPress and how to edit it, you may be wondering what changes you can actually make. There are a lot of things you can do with this file – too many to cover in one post. However, we’ll look at a few examples to get you started.
First, let’s talk about redirects. If you move a page or post – or your entire website – you’ll need to automatically direct users who visit the old URL to the new location. This requires setting up a 301 redirect, and is something you can do with the .htaccess file in WordPress.
To redirect a single page, you can add this line to the bottom of your .htaccess file:
Redirect 301 /oldpage.html http://www.yoursite.com/newpage.htmlReplace /oldpage.html with the page’s old permalink, and the following URL with the new link to the page. You can add a new line for each page you’d like to redirect.
You can also use similar snippets to redirect your entire website. Or, you can use a snippet to send all traffic to the secure HTTPS version of your site (if you have an SSL certificate).
You can also use the .htaccess file to make a lot of security-related changes to your site.
For example, you can add this code to deny unauthorized users access to several important core files:
<FilesMatch "^.*(error_log|wp-config\.php|php.ini|\.[hH][tT][aApP].*)$">
  Order deny,allow
  Deny from all
</FilesMatch>
To learn more about using the .htaccess file to improve security, you can check out the WordPress Codex entry on the subject. Just remember to back up your site and use a staging environment when trying out any changes!
In Conclusion
Learning to work directly with your website’s files is an important step in your journey to becoming a WordPress expert. The .htaccess file is a good place to start, since it’s a relatively simple file that can nonetheless be used for wide variety of applications.
Before you make any changes to the .htaccess file in WordPress, be sure to back up your site and use a staging environment just in case. Then, you can use FTP to access your site, find the .htaccess file, and edit it. Once you know how to do that, you can simply look up the code required to add whatever functionality you require. We hope that this article be useful for you. Good luck!


