Google fonts are amazing free resource for web designers. So, how to add Google Web fonts in WordPress themes. In this article, we will show you how to add Google Web Fonts in your WordPress themes the RIGHT way, optimized for performance.
Find the Google Web Fonts that You Like
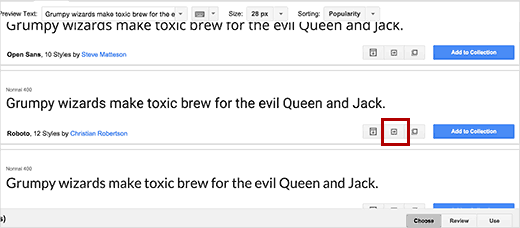
First thing you need to do is find a Google font that you like. Head on over to Google fonts and browse through the library. When you find the font that you like, click on the “Quick-use” button.

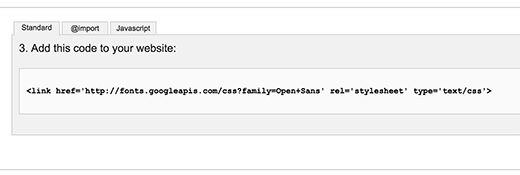
Once you click the quick-use button, you will be taken to a new page. Scroll down till you see the usage instruction box with code that you can add to your website.

You will see that there are three different tabs for adding the font to your site. The first one is the standard and recommended method to add Google fonts to your site. The second tab uses the @import CSS method and the last method will be through enqueue.
We will show you how to use each of these methods and what are there pros and cons.
Adding Google Web Fonts in WordPress Themes
We have mostly seen folks using the first two methods.
The easiest way would be to open your theme’s style.css file and paste the fonts code that you got in the @import tab, like this:
@import url(http://fonts.googleapis.com/css?family=Lora);
@import url(http://fonts.googleapis.com/css?family=Oswald);
You can also combine multiple font requests into one. Here is how you would do it:
@import url(http://fonts.googleapis.com/css?family=Lora|Oswald);This method is super easy but it is not the best way add Google fonts to your WordPress site. Using @import method blocks parallel downloads, which means the browser will wait for the imported file to finish downloading before it starts downloading the rest of the content.
If you MUST use @import, then at least combine multiple requests into one.
Performance Optimized Method of Adding Google Web Fonts
The best way of adding Google fonts is by using the Standard method which utilizes the link method instead of the import method. Simply take your font URL that you got from step 1. If you are adding multiple fonts, then you can combine the two fonts with a | character. Then place the code in your theme’s head section.
You will most likely have to edit your header.php file, and paste the following code above your main stylesheet.
The example would look like this:
<link rel="stylesheet" type="text/css" href="http://fonts.googleapis.com/css?family=Lora|Oswald" media="screen">
<link rel="stylesheet" type="text/css" href="YOUR THEME STYLESHEET" media="screen">
Basically the goal is to put the font request as early as possible. According to the Google Web Fonts blog, if there is a script tag before the @font-face declaration, then Internet Explorer won’t render anything on the page until the font file is done downloading.
Once you have done that, you can simply start using it in your theme’s CSS file like this:
.font-style-selector {
    font-family: 'Oswald', Helvetica, Arial, serif;
}
Now there are a lot of theme frameworks and child themes out there. It is NOT recommended to modify your parent theme’s files specially if you are using a theme framework because your changes will be overridden the next time you update that framework. You will need to utilize the hooks and filters presented to you by that parent theme or framework to add Google fonts properly in your child themes.
Properly Enqueuing Google Fonts in WordPress
Another way to add Google fonts to your WordPress site is by enqueuing the font in your theme’s functions.php file or a site specific plugin.
function br_add_google_fonts() {
  wp_enqueue_style( 'br-google-fonts', 'http://fonts.googleapis.com/css?family=Open+Sans:300italic,400italic,700italic,400,700,300', false );
}
add_action( 'wp_enqueue_scripts', ‘br_add_google_fonts' );
Don’t forget to replace the font link with your own.
In Conclusion
We recommend you use the latest way because it more suitable with WordPress enqueue rules. Sure, you can use any way that you need. We hope that this article be useful for you. Good luck!


