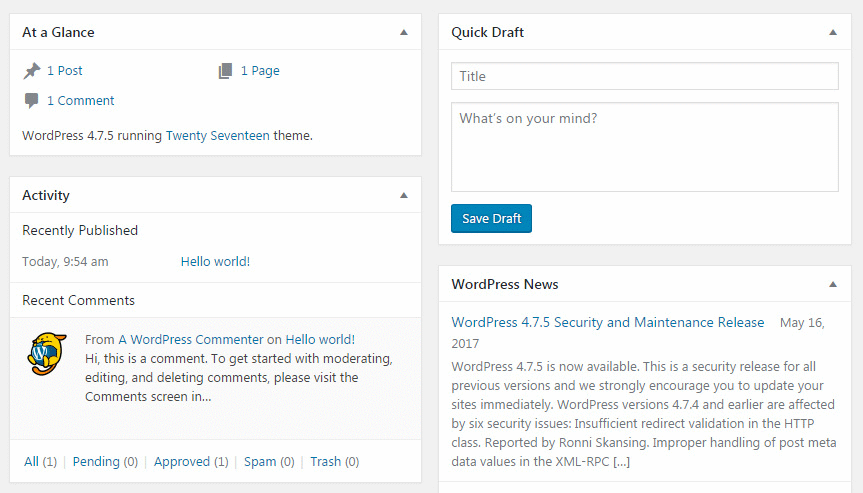
The purpose of the WordPress dashboard page is to give you a brief overview of your site so you can see what has happened since your last visit to the admin area.
The dashboard can contain information such as a status of your posts, it can show you new comments or even show you all kind of statistics. Depending on the theme and plugins you are using, the dashboard may look quite different on every WordPress system.
If you would like to customize your own WordPress dashboard, here are a few tips that will help you:
- Change the number of dashboard columns
- Prevent dragging dashboard items
- Add a custom dashboard link
- Remove Welcome Panel from the dashboard
- Allow only admins to access wp-admin pages
Change the number of dashboard columns
After WordPress 3.8 update, screen options which allowed you to change the number of columns which make up your dashboard has disappeared. Now, the standard dashboard layout will force your meta-boxes to organize into 2 columns.
If this is something you want to change, we will teach you how to in this part of the article. You may want to change the layout back to 1 column which can make your dashboard look more neat and organized, or if you need more stuff on the board, you might want to expand it and add a third column in the picture. It’s really up to you.
Change the number of dashboard columns:
- As usual, open your functions.php file
- Copy and paste this code:
function dashboard_columns($columns) {
  $columns['dashboard'] = 1;
  return $columns;
}
add_filter('screen_layout_columns', 'dashboard_columns');

function layout_dashboard () {
  return 1;
}
add_filter('get_user_option_screen_layout_dashboard', 'layout_dashboard');- Change the number on the line #2 and #6 to any number of columns you want
- Save changes.
After you save the new function, you will be able to navigate to your dashboard to see how the changes are taking effect. You can now easily drag and drop meta-boxes which are available to you and reorganize your dashboard.
If you have set the number of columns to a number higher than 1, you can easily change the number without tampering with the code again. Simply navigate to your screen options which are located on top of the dashboard page and now you will be able to see the option to change the layout by choosing from any number ranging from 1 to number you have put in the code.
How to prevent dragging dashboard items in WordPress
By default, items found on your WordPress dashboard can easily be dragged around and rearranged. This comes in handy when you have a lot of content placed on the dashboard and you want to organize the workspace. Nobody likes to work in a messy office, right?
Whatever the reason you might have for disabling this function, we will show you the code which will make the rearranging impossible. After you copy and paste this function, you won’t be able to rearrange your dashboard items anymore. Actually, no one using your website on the backend will.
Prevent dragging dashboard items:
- Open functions.php file
- Copy and paste the following function:
function remove_postbox() {
  wp_deregister_script('postbox');
}
add_action( 'admin_init', 'remove_postbox' );
3. Save changes
If you only want to disable this feature for you authors and other user roles but leave the power of rearranging dashboard items for yourself, you need a quick code rewrite:
if (!current_user_can( 'manage_options' )) {
  function remove_postbox() {
    wp_deregister_script('postbox');
  }
  add_action( 'admin_init', 'remove_postbox' );
}
That’s all there is. If you ever feel like you need to rearrange dashboard items again, simply comment out this function or delete it until you organize the dashboard as wanted. Then you can activate the function again if needed.
Add a dashboard link in WordPress
As an admin, your job is to create the best working environment for your authors. That includes customizing WordPress and creating a unique virtual workstation.
We already taught you how to add any RSS to the dashboard. Another idea you can easily implement is adding links which can be used as bookmarks right on your dashboard.
If there are pages which you open on a regular basis when you work on your WordPress powered website, wouldn’t it be great to have them bookmarked on the dashboard? Yes, it might be a good idea to have all authors bookmark those websites in their own browsers but placing the most important links on the dashboard makes them available to everyone who works on your site. There won’t be excuses that the links have been lost or that you have forgotten to bookmark them in your new browser.
It is easy to start adding bookmarks. Follow these simple steps and you’ll be done in minutes.
Add a dashboard link:
- Open functions.php
- Copy and paste the code:
function linkedPage(){
  if(!current_user_can('manage_options')){
    wp_die( __('You do not have sufficient permissions to access this page.'));
  }
?>
<script type="text/javascript">
  window.open("YOUR-URL");
</script>
<?
}

function dashboardMenu(){
  if(function_exists('add_submenu_page'))
  add_submenu_page('index.php', __(LINK-NAME), __(LINK-NAME), 'manage_options', 'stats', 'linkedPage');
}
add_action('admin_menu', 'dashboardMenu');
3. Save changes
After you have copied the code, there are only few thing you need to change in order to customize the link.
4. Change the link URL on line #7
For example:
window.open("http://www.google.com");5. Name your link on line #12:
Change “LINK-NAME” in the brackets to anything you want. In the same example, you would probably want your link to be named “Google”:
add_submenu_page('index.php', __(Google), __(Google), 'manage_options', 'stats', 'linkedPage');That’s all. After you save the changes again, a new link will appear on your Dashboard menu. After you click the link, a new tab will open and show the page you have specified in the code. Easy as that.
Add additional links t the dashboard:
If you want to add more than one dashboard link, follow these steps:
- Copy the first function named “linkedPage”
- Paste it into the first function and rename it, for example, linkedPage2
- Change the URL to the new function
- Locate the add_submenu_page in the second function and copy the entire row
- Copy and paste the row underneath the first one
- Change the name of the link as shown above
- At the end of that line, find ‘linkedPage’ and change that to name of your new function (in our example that would be ‘linkedPage2’
- Save changes
Enjoy your new bookmarks on your WordPress dashboard. We hope you like this little trick. Since you’re already customizing the dashboard, see how to completely remove the welcome panel.
How to remove Dashboard Welcome Panel
Welcome Panel was introduced in WordPress v3.3 and since then it has allowed faster navigation for beginners. This panel introduces buttons and links which will lead users towards theme customization. This way, new users got a chance to reach their first pages, options, widgets, etc.

But if you have already worked with WordPress, or your client doesn’t need this kind of help, the panel will only get in your way and take up the always needed space.
In version 3.5, a new hook was introduced which allows us to remove Dashboard Welcome Panel easily. Follow these few steps and you can say goodbye to your Welcome Panel.
Remove dashboard welcome panel:
- Find functions.php file located in your theme
- Copy and paste the hook:
remove_action('welcome_panel', 'wp_welcome_panel');- Save changes.
- Navigate to your Dashboard which now doesn’t contain Welcome Panel
If you want to further improve the dashboard area, you may consider adding chat to the area where your other admins and authors can communicate or add Youtube Analytics if you like working with videos.
Allow only admins to access wp-admin pages
When it comes to WordPress security, it is better to do everything you can to make sure there are as few as possible ways of entering admin dashboard. When you allow your visitors to sign up to the site so they can post comments or so you can give them extra content based on that, you probably don’t want those users to be able to login to your dashboard and see what you’re up to.
Yeah, you do have your username and a special admin password, so an average user can do nothing even if he opens the wp-admin login page, but why would you even give a visitor a chance to take a peek at your admin pages?
In this part of the guide, we will show you how to easily prevent users who aren’t admins to have access to wp-admin pages.
Do it Manually:
First, here’s a simple solution in a form of a code. As usual, you only have to copy and paste the code into your functions.php file to make the changes. The code will allow anyone with administrator rights to access wp-admin page while anyone else will be redirected to the homepage. Simple as that:
- Open functions.php file from the theme you are using
- Copy and paste this snippet:
add_action( 'init', 'blockusers_init' );
function blockusers_init() {
  if ( is_admin() && ! current_user_can( 'administrator' ) && ! ( defined( 'DOING_AJAX' ) && DOING_AJAX ) ) {
    wp_redirect( home_url() );
    exit;
  }
}
3. Save changes
In Conclusion
In most cases, the first thing you will see after logging into a WordPress site is the WordPress Dashboard. Although it’s not something your visitors will get their eyes on, we think that you should take the time to customize it to your needs. After all, this is the place where you’ll spend most of your time when managing the website.
So, take your time and build the Dashboard you’ve always wanted.
Related Posts

How to Fix “Briefly Unavailable for Scheduled Maintenance” Error in WordPress
WordPress added support for automatic updates in version 3.7 which allows WordPress to update itself to minor releases. A common problem when updating on shared WordPress hosting is that the update process may timeout, leaving your site in maintenance mode and inaccessible. In this article, we will show you how to fix “Briefly unavailable for scheduled maintenance” error in WordPress. Why […]
Read More
How to Fix the 500 Internal Server Error in WordPress
Internal server error is not specific to WordPress. It can happen with any website running on a web server. Due to the generic nature of this error, it does not tell the developer anything. Internal server error in WordPress is often caused by plugin or theme functions. Other possible causes of internal server error in […]
Read More
Google Matched Content to Show Related Posts in WordPress
Did you know that you can use Google AdSense to also show related posts in WordPress? Matched Content is a Google AdSense feature that allows you to show related posts in WordPress while also make money by displaying ads alongside. In this article, we will show you how to easily use Google Matched Content to […]
Read More
How to Add a Copyright Notice in WordPress
Almost every website that you find on the Internet will have a copyright notice which gives basic information about the site. Even though the law has changed and placing a copyright symbol won’t actually protect your work, there is an unwritten rule for web designers to put a notice in the footer of the website they have created. […]
Read More