Adding your First Product
So we’re finally ready to add our first products! I always find it better to add some products before looking at the styling as you can see how everything is going to look once you have setup products, cross sells, upsells, sales etc. Even if you create some placeholder products it can save you time later going back in to fix a bug with something you didn’t initally think about. WooCommerce products are essentially posts in a custom post type, so adding new products should be very familar to most WordPress users, obviously there is some “Special Sauce” in there to add the e-commerce magic! Let’s add some products.
WooCommerce supports four different product types:
- A Simple product is used in most cases. It is usually product that is shipping and has no options. For example a board game or umbrella. (Because we all sell board games and umbrellas?)
- A Grouped product is a collection of related products which can be purchased individually. For example a Playstation3 could be a grouped product with 80Gb, 120Gb and 200Gb being variations of the same parent product.
- An External or Affiliate product is on you list in your online store and may describe but is sold on a third party site.
- A Variable product is the most complex of products to work with. I can have several different versions, each with it’s own SKU, price and stock options. Most commonly used in clothing, for example a T-Shirt available in multiple sizes and colours.
As WooCommerce is built on top of the standard WordPress post functionality you also get a set of custom taxonomies. Categories and tags both behave exactly like they do for you blog posts. Making sure you use your store categories properly can be the real make or break of your store. This is how people will navigate your products so think about your category structure carefully. You can create child categories as well so use these to categorise your products.
Adding a Simple Product
Adding a simple product should feel very familiar to most WordPress users. The interface is almost the same as the standard WordPress post screen with the addition of some extra custom meta boxes. You enter your product title and description in the main WordPress dialog box. You can use all the same formating as you would do in any normal WordPress post.
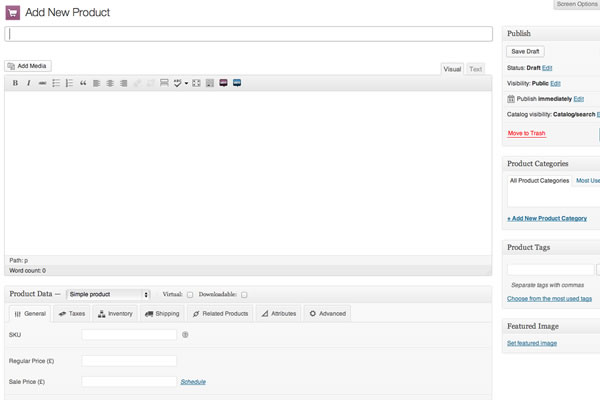
Underneath is the Product data meta box. This is where you add a lot of the important information. At the top of this is the product type dropdown selector, from here you select you product type. You can also check the boxes if it is a virtual or downloadable product (we’ll come back to these later). First off we have the General tab this is where you set your SKU (Stock Keep Unit) this used as a unique identifier for your product (it is optional and can be switched off site wide in the Catalog Settings as described in our Setup Guide).
Next we have you price fields, the regular price is your normal selling price for the product you can also set a sale price with a schedule for that sale price. This is a nice addition as you can setup a schedule for perhaps a weekend offer. Users will see the full price and the special sale price. Underneath the price fields you can see weight and dimension fields (if you have not turned them off in your Catalog Settings) these can be particularly useful if you are using a shipping extension like UPS or FedEx as you can automatically calculate shipping costs based on these dimensions and weights.
We move on to the Tax tab, here you go can override your products tax status or define it’s tax class if you have setup additional tax classes in your tax setup. In the Inventory tab this allows you to override your global inventory settings for an individual product and change for options for handling backorders. Also with the Shipping tab you can define a specific shipping class for your product if you have these setup.
We now move on to a really interesting feature on the Related Products tab. From here you can cross promote your products with one another. Simply starting typing the product name and it will do a search against your product list. Up-sells are displayed on the product details page. These are products which you may wish to encourage users to upgrade to based on the product they are currently viewing. For example if the user is viewing the Nintendo DS product listing page, you may want to display the Nintendo 3DS on that same page as an up-sell. Cross-sells are products which are displayed at the cart and related to the users cart contents. As an example if the user adds a Nintendo DS to their cart, when the arrive at the cart page you may want to suggest that they also purchase spare Styluses.

The Attributes tab we will come to later when we discuss variable products. Finally we have the Advanced tab here you go set an optional note to send to your customer after the purchase, give the product a custom menu position and set it’s group (if you are using a grouped product). You can also override your global review setting here.
Underneath you will see the Product Short Description this is your product excerpt. If you don’t enter anything in here one will be created automatically for you like any WordPress post.
Finally in the publish panel you have a number of extra options:
- Catalog and Search – Visible everywhere.
- Catalog – Only visible in the catalog loops, will not be shown in search results.
- Search – Only visible in search results and is not shown in the catalog.
- Hidden – Only visible on the single product page, will not be shown in catalog pages or in search results.
Product Media
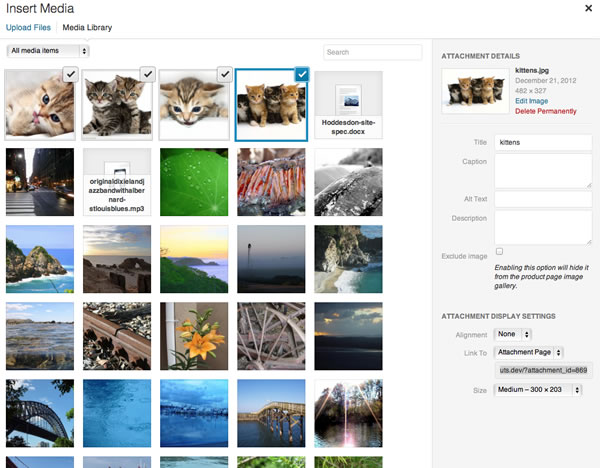
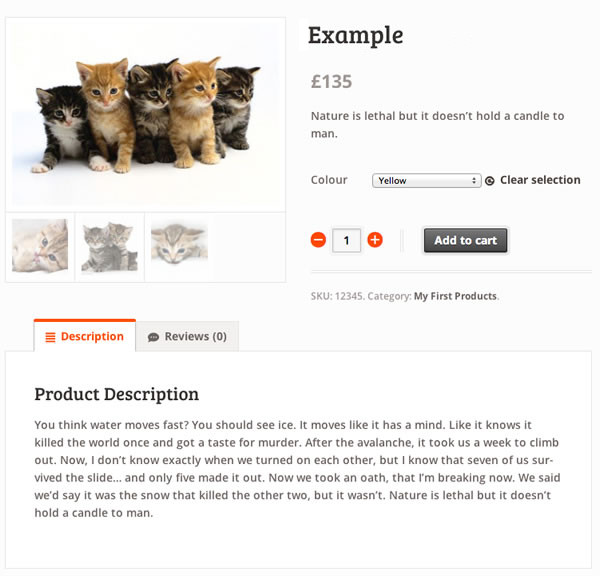
As you would expect with any e-commerce system you can add multiple images to your products and WooCommerce will handle them nicely. Working with WordPress 3.5 you will also get to benefit from the improved media manager. Adding images to your product is much the same as any WordPress post. You can set a featured image and you can also add multiple images, the difference is that you don’t need to insert anything into your post. Any image you attach to your product but don’t set as the featured image will appear below your featured image and form a small product gallery. You can see an example below. WooCommerce also has it’s own Lightbox effect built-in which you can switch on or off in your WooCommerce settings depending on your needs.
Adding a Grouped Product
A grouped product is created in much the same way as a simple product. The only difference in fact is choosing “Grouped” from the Product Type dropdown in the General tab. Upon choosing this the price several fields will disappear, this is fine, you’ll be adding these fields to the individual child products. Once you’re happy with the grouped (parent) product, publish it and come back to the Add New Product page.
Now you need to add the child product which sits within the grouped product. The only information you’re required to fill in here is the following:
- Title. E.G. Playstation 3 80 GB.
- Product Type (simple).
- Product Price and Stock.
- Parent post (inside the Advanced tab). Choose your parent (E.G. Playstation 3) from the selectbox.
Adding a Virtual Product
A virtual product is a product that does not ship and does not have any stock to manage. When adding a simple product simply tick the “virtual” box in the product type panel and any unneccassary fields (like dimensions or weight) will be removed. A virtual product could be anything you like from a one off fee to acess parts of your site where manually move the buyer into a new group.
Adding a Downloadable Product
Like with a virtual product when adding a simple product you can check the “downloadable” box. This will add three new fields:
- File Path – This is the path for the file you want to deliver after purchase. You can also upload a file from here and WooCommerce will place it in a special folder it restricts access to.
- Download Limit – Here you can limit the number of times your buyer can download the file. You can leave it blank to allow unlimited re-downloads
- Download Expiry – Here you can set the number of days after purchase before the download link expires. Again you can leave it blank to disable.
If you are offering both a digital download and a physical boxed product you can also charge shipping on downloadable products. That way you have one product for both a boxed and digital version. If you also check the virtual box this will disable the shipping charges.
Adding an External Product
Choose ‘External/Affiliate’ from the product type drop down. This will remove unnecessary tabs such as tax and inventory and insert a new product URL field. This is the destination at which users can purchase the product. Rather than add to cart buttons, they will see a read more button directing them to this URL.
Adding a Variable Product
Get ready because this is one of the most complicated products to setup. Be patient though as once you have mastered it you will love it! Variable products allow you to sell multiple variations of the same product each with it’s own price, SKU, stock numbers and if you want to image. First we need to select “Variable product” from the product type select panel we next need to define some attributes for our product these are what our variations are linked to. Attributes can form an important part of your store and can be defined either globally or individually. As well as being used in variations attributes can help categorise your products allowing your users to find what they are looking for easily. The WooCommerce documentation gives a perfect example.
Say you’re opening a video game store, selling all the latest games for all the latest consoles. In this case, your top level product category will most likely be Games inside of which the majority of your catalog will reside.
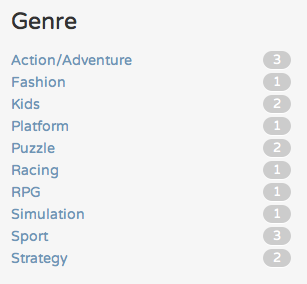
Now, you could very easily create sub categories for different consoles, genres, etc etc but this information is better suited as attributes. Why? Because a user can select concurrent attributes while refining their search.
Example: they’re looking for a sports game for the PS3. This is as simple as navigating to the Games category, then selecting the PS3 and Sport attributes from a sidebar widget. As you’d expect, this will refresh the page so that it only displays sport games for the PS3.
WooCommerce provides a widget you can use to navigate your attributes. You can view more information on this in the WooCommerce documentation.
So back to our product, we have selected variable product from our product type select panel and now we need to associate our attributes. Clicking on the attributes tab will allow us to either select a global attribute or add one to this individual product. You should create global attributes if you are going to use them more than once for example sizes if you are making a clothing store or colours. You can also add multiple attributes to a single product again for example size and colour. When you have added your attributes be sure to check “Used for Variations” this will then make them show up in the variations tab. Once you have added your attributes you need to save your product.

Now we’ve added our attributes and saved our product we can go to the variations tab. You can manually setup your variations by clicking “Add Variation” or you can simply click “Link all Variations” this will automatically create your variations for you linkingall the possible combinations of variation attributes (maximum 50 per run).
So if your example you had 2 attributes – colour (with values blue and green) and size (with values large and small) it will create the following variations:
- Large Blue
- Large Green
- Small Blue
- Small Green
Once you have all your variations added you can then go through and update your product data. Each variation can have it’s own set of data from the following:
- Image – Click the image icon to see the WordPress media uploader, once you have uploaded your image simply click “Insert into Post”. When a user selects a variation with a separate image the main product image will update from the set featured image to the image set in the variation. This means you can technically have a different image for each variation. Particularly useful for colour variations.
- SKU – You can set a SKU for your variation or simply leave it blank and it will inherit the parent products SKU.
- Stock Quantity – You can set a stock quantity for the variation of leave it blank to use the parent stock settings. You can also set it to zero to indicate out of stock.
- Weight/Dimensions – These can be set for the variation of left blank to inherit from the parent.
- Price – The only required field here you set the price of your variation.
- Sale Price – You can set a sale price for a particular variation. Useful if you need to sell through on a particular variation.
- Downloadable – If this variation is a downloadable product, check the box. You can then input file URL and download limits.
- Virtual – If the variation is virtual, check the box.
- Enabled – Uncheck the box to disable the variation. It will no longer be available.
- Shipping class – Shipping class can affect shipping. Set this if it differs from the parent.
- Tax class – A tax class for this variation. Useful if you are offering variations spanning different tax bands.
You must set a price for each variation, however you can bulk edit the variations by using the bulk edit bar above your variations. You can also set the default variations that will be top of the dropdown when users are looking at your product in the front-end.
Variable products can be a little hard to get your head around. It is worth putting in the time to get the hang of though as they can really add to the overall user experience for your shoppers.
Theming and Styling
In the first part of our series we looked at the general settings for WooCommerce where you could enable the WooCommerce CSS Styles. We’re going to dig a little deeper in to how you can get WooCommerce looking good. First up 9/10 times it should look pretty good out of the box with the default WooCommerce CSS enabled. You can test very quickly by ensuring the default WooCommerce CSS is enabled in the general settings.
You should be able to very quickly see how WooCommerce will work with your theme. If you do need to make any changes to the CSS then I do the following:
- Locate
/wp-content/plugins/woocommerce/assets/woocommerce.cssand copy this file to your theme folder. I usually copy it to a file called woocommerce.css (makes sense doesn’t it!). - The file is compressed CSS so you will need to un-compress it, I use PHPStorm so “Tidying” the CSS to a readable and usable format is fairly easy. You can beautify your CSS using this online tool if you don’t have anything similar in your code editor.
- You will also need to add the WooCommerce images to your theme. Simply copy
/wp-content/plugins/woocommerce/assets/images/to a folder inside your theme folder and be sure to update the paths in your new woocommerce.css - We need to get our theme to recognise our additional stylesheet.
<?php function my_woo_style() { wp_register_style( 'my-woocommerce', get_template_directory_uri() . '/woocommerce.css', null, 1.0, 'screen' ); wp_enqueue_script( 'my-woocommerce' ); } add_action( 'wp_enqueue_scripts', 'my_woo_syle' ); ?>WordPress now knows about our new stylesheet and will add it to our WordPress generated pages. You can get get more information about registering and enqueuing styles in the WordPress Codex. - In the WooCommerce General Settings make sure you uncheck “Enable WooCommerce CSS styles”. Or if you prefer you can disable it via your theme (useful to stop pesky clients messing things up!)
<?php // Disable WooCommerce styles define( 'WOOCOMMERCE_USE_CSS', false ); ?>
I now have a copy of the WooCommerce deafult CSS inside my theme so I can make updates without having them wiped out by plugin updates. It should look exactly the same as it did when you had the default CSS enabled through the settings. You can do most of your changes with CSS if you are having issues though there are a couple of other things to know about. Your first issue is probably going to be the wrapper div around the WooCommerce content. You can use your own template page for WooCommerce to use for all of it’s content.
- Copy your themes
page.phpand name itwoocommerce.php - Open up your new file in your code editor of choice and locate the loop. This will usually start with:
<?php if ( have_posts() ) : ?>and end with:<?php endif; ?>This can vary depending on your theme. - Replace the loop with the following code:
<?php woocommerce_content(); ?>
Some of the WooCommerce features and styling can be done by using the WooCommerce actions and filters. Just like the WordPress core WooCommerce has an extensive set of actions and filters you can hook into or override. You can change the wrapper div using the following action:
<?php
//Change Wrapper
remove_action( 'woocommerce_before_main_content', 'woocommerce_output_content_wrapper', 10);
remove_action( 'woocommerce_after_main_content', 'woocommerce_output_content_wrapper_end', 10);

add_action('woocommerce_before_main_content', create_function('', 'echo "<div id=\"mycontent\">";'), 10);
add_action('woocommerce_after_main_content', create_function('', 'echo "</div>";'), 10);
?>
By pasting the above code into your themes functions file you can change the default wrapper around the WooCommerce output. In the example we have used an ID of mycontent you can of course set it to whatever you need to.
There are lots of other useful actions you can use to customise WooCommerce even more, some of my favourites are below:
<?php
//Remove Breadcrumbs
remove_action( 'woocommerce_before_main_content', 'woocommerce_breadcrumb', 20, 0);

//Get Rid of Stupid Tabs
remove_action( 'woocommerce_after_single_product_summary', 'woocommerce_output_product_data_tabs', 10);
remove_action( 'woocommerce_single_product_summary', 'woocommerce_template_single_excerpt', 20, 2);
add_action( 'woocommerce_single_product_summary', 'woocommerce_product_description_panel', 20 );

//Remove Product Reviews
remove_action( 'woocommerce_product_tabs', 'woocommerce_product_reviews_tab', 30 );
remove_action( 'woocommerce_product_tab_panels', 'woocommerce_product_reviews_panel', 30 );

//Remove Sidebar from WooCommerce
remove_action( 'woocommerce_sidebar', 'woocommerce_get_sidebar', 10);
?>
If you still want more control you can completely override all the theme files for WooCommerce. Copy the folder /wp-content/plugins/woocommerce/templates to your theme and rename it woocommerce. You can now change the theme files without fear of being wiped out by plugin updates and have you can change everything! The WooCommerce documentation is quite good and is always being improved you can also get involved by heading over to the WooCommerce GitHub repo.
Lastly WooThemes do offer a few free themes for WooCommerce which can serve as a great starting point for you and a great way to learn more about how to theme for WooCommerce. “Mystile” is a great free theme for WooCommerce and offers a clean, modern look for any store and really does show off the full features of WooCommerce. The free themes do look great and give you plenty of flexibility whilst the premium themes as you would expect take things a little bit further and give you a lot more options to play with. Most of the themes for WooCommerce are more like frameworks so you can create a child theme and make your own mark.
Even if you don’t fancy jumping in to developing your own extensions I would urge you to have a go with your own theme as you will find it much more rewarding, hopefully the information above gives you enough to get started.
Next Steps
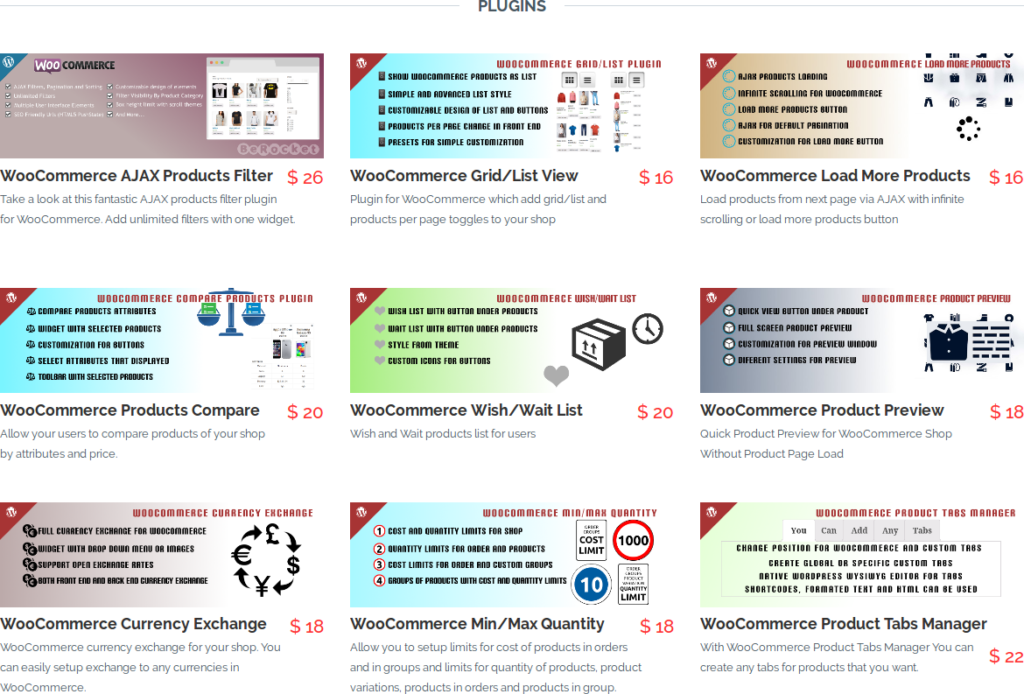
We’ve been through all the steps needed to launch your WooCommerce store. Along the way I’ve touched on a few “Premium” extensions. Now we’ve built our store using nothing but the “Free” Open Source plugin, but you can do so much more with WooCommerce. Obviously you don’t have to pay for any extensions you could develop your own. WooCommerce even encourage this with their documentation, however for most users they are going to want clicky clicky install type setup for their extensions not sit down and write 300 lines of code hooking into a dozen different actions. The BeRocket plugins store is fairly extensive and covers lots of features that you may want. You can even setup memberships and subscriptions with WooCommerce, force certain products to be added to the cart, add watermarks to your images all sorts of things.
Of course we have only just scratched the surface of WooCommerce it has a lot to offer. It includes a great coupon system for offering special discounts to your customers with a whole load of useful options including limiting the offers to certain products and even making codes time sensitive. WooCommerce also includes all the reporting you would expect from an e-commerce system and can be expanded further to intergrate with accouting systems like Freshbooks or Xero using premium extensions. The possibilities are really endless.
Conclusion
There we have it. In no time at all we have installed the plugin, gone through the intial setup. We’ve setup our shipping costs and setup PayPal as our payment gateway. We’ve talked about how to add products and even touched on complex product variations. We’ve even looked at the different ways in which you can style your store. You should be all set for opening your WordPress e-commerce store.
WooCommerce is a great solution that I really enjoy working with. With the development being done on Github it also allows me to follow the development as it happens, it even makes it really easy to contribute if you spot something that you can fix! WooCommerce for me is the only e-commerce solution for WordPress. As a developer and as a user it just works and it works well!
